Showing posts with label organization. Show all posts

Wednesday, February 4, 2015

Before & After - the Playroom


The playroom used to be a workout room - complete with gross, stinky, moldy all-weather carpet. Here's a few pics that I snapped during our home inspection -


Thursday, January 6, 2011

What I did over Christmas vacation...

So while most people spent their Christmas holidays eating, getting some much needed R&R, or catching those after-Christmas sales, I spent every spare minute (read: Heidi's nap times and the hours after her bedtime) refinishing and re-purposing an old sewing table I snagged at a thrift store for $10.  Here's a pic of the table before I got to work:


Maybe it would help if I first explained what possessed me in the first place to buy a sewing table for our house.  You see, our house was built in the 1940s, well before the concept of a ""foyer" or "entryway" had even entered the vocabularies of home builders.  As such, our front door, and the door we use every day, opens directly into our living room.  This makes for a messy and cluttered area right by the base of our stairs, as this is where we tend to drop all of our bags, packages, etc. upon entering the house:


Due to the layout of the area when you first walk into our house, we didn't have the luxury of adding a storage bench like this, although I do love the concept:

image courtesy of Pottery Barn

I was looking more for a piece of furniture that could double as a side table while providing some sort of solution for our work bags - in my head I was visualizing a sort of console table cut down to side table height, width and depth, since this is the space I was trying to fill:


When I stumbled across the sewing table, I knew that the majority of the dimensions would work, and I figured that it wouldn't be too difficult to cut the legs down to make it the appropriate height for my space.  So, armed with the tutorial provided by John and Sherry from YoungHouseLove here, I got to work.

I started by taking the drawers out, the legs off, and the folding table top off.  Then I got to work sanding everything to within an inch of its life.  I was nervous at first that I would sand all the way through the veneer, since this is definitely not a solid wood table, but the veneer was luckily thick enough to withstand a LOT of sanding.  After I'd made my first sanding pass, I knew there would have to be a second one, since everything looked pretty streaky/dark still:


So I broke out the power sander and some 60-grit sandpaper, and got to work.  The second pass was much more even and smooth:


My first piece of advice, SAND OUTSIDE!  I was in the basement, since it was super cold/dark outside, and it resulted in everything in the basement being coated in a THICK layer of dust.  I've learned my lesson.

Then, I got to work staining everything.  I chose "Ebony" by Minwax, after deliberating for like a half hour in Home Depot:


I followed the directions on the can to a T, waiting the requisite number of hours between coats to allow the stain to full soak in, and then lightly running over the stained surface after about 20 minutes with a rag. It took 2 coats on the majority of the surfaces to get the color I wanted, but a couple of surfaces took 3 coats (I'm not entirely convinced that this table was assembled with all of the same types of wood....).  Here's a couple of pieces after the first coat:


And here's after I was finished - and after my husband (or, rather, my neighbor) cut the legs down to the 23" height I needed:


I ended up painting the detailing around the drawer fronts the same color as our walls in the living room, mostly because we already had that color on hand - sort of a mocha brown/khaki color.  Then I applied 2 coats of polyurethane (Minwax again), following the directions on the can, switched up the hardware for something more modern, and here's the finished product:


Much more contemporary for my tastes.  The open area under the table is where we will store our work bags, as evidenced here:


I also lined the drawers with a fun fabric I found at Joann's Fabric 40% off - the pattern is sort of reminiscent of the time period I envision this sewing table having actually been used (50's/60's I'm guessing) - they will soon serve as storage for our mail prior to us going through it - I envision a drawer for me and a drawer for Robb - and one for magazines and catalogs:


This project, while certainly quite the undertaking, has given me the confidence I need to refinish my grandmother's oak bedroom set from the 1940's which I used growing up, and which I plan for Heidi to use as well - but I'm going to wait for the weather to get a little nicer before I start that project so I can SAND OUTSIDE!

Thursday, December 30, 2010

Christmas Aftermath....

Wow.  In the words of my mom, apparently "Santa hit the Nolan household and stalled".  Or at least that's what it looked like when we arrived to "Nonie and Grampy's" house on Christmas afternoon to a mountain of presents - mostly for Heidi and her cousin Connor, of course.  When we got back home and unpacked everything, I was left with the dilemma of where to put everything.  Not to mention the fact that Robb and I had given Heidi a beautiful wooden play kitchen for Christmas, which, while beautiful, also contributed to the massive amount of toys in the playroom/family room/sun room.  I knew that the storage that I had in place before Christmas wasn't going to be able to cut it for the aftermath of Christmas toys.  While Heidi did receive a beautiful toy box handcrafted by her great-grandfather, it wasn't the best solution for toy storage for all of her toys, since they all wouldn't fit in there, and she currently isn't tall enough to reach in to choose the toy she would like to play with.  Here's a couple "before" shots  - meaning before a storage solution, but "after" Santa's visit:


See how her toys are all just piled in the toy box?  I wanted to find something that would better display her toys so that she could choose the toy she wanted - instead of pulling me by the arm, and pointing and grunting until I correctly provide her with the toy she had been looking for (which was her chosen method when her toys were stored using the above method).  A friend of mine (thanks Emily!) clued me in to the IKEA Expedit series of products - specifically the 2 x 4 cube bookshelf, as pictured here:

image courtesy of IKEA

So, the day after Christmas, we made a family trek to IKEA to pick this up  - at $69, I considered it a bargain.  It was super easy to put together, albeit pretty heavy, and I think it looks great serving as our sofa console table/toy storage shelf - the dimensions were similar to the dimensions of our console table that was there previously (which I just sold on Craigslist, together with the matching coffee table, for $100!).  Here's how Heidi's play area looks now (when she's sleeping of course - when she's awake and playing , all bets are off!):


I'm currently searching for a nice, thick 5x7 rug to put in place of the rug/mat hodge podge that's going on there now, but for the moment, the rug/mat serves its purpose by creating a barrier between Heidi and the ceramic tile floor!

I know it's been awhile since my last post - in addition to spending time with my family, I've also been working on several additional projects concurrently, which I hope to unveil in the coming days, so stay tuned!


Tuesday, December 14, 2010

Another Junk Drawer Makeover....

So maybe I'm carving my niche in the virtual world with yet another Junk Drawer Makeover post (see the original post here), but here it is.  My dear sister Kelly let me tackle her troublesome kitchen junk drawer - all while we were watching an episode of Modern Family ( I LOVE that show!).  Here's her drawer before:


And here I am in the process of reorganizing the drawer (these pics are courtesy of my brother-in-law, Sean):


And here's the AFTER shot:


Here's a few tips that I found helpful when organizing this drawer:

1) Ziploc bags are your friend!  For drawers with a lot of cables/phone chargers/headphones, a good way to keep them untangled and in easy reach is to put each unique item in its own bag, and label the bag's contents with a permanent marker.  You can see from the above picture that Kelly's cables and cords are all located in the upper left section of her drawer, using the methodology I've just described.
2) Don't waste money on fancy drawer organizers when you have plastic food storage containers - here's a use for those food storage containers for which you can no longer find the top - use them in a junk drawer to keep like items with like items.  In the photo above, I've used plastic containers to group pens and pencils, markers, notepads, and miscellaneous hardware/tools.
3) Apparently, as evidenced by this pic, in Kelly's case, you can never have too much electrical tape!

Monday, November 29, 2010

Before & After: The JUNK Drawer

So I needed a quick 20 minute or so kitchen project while Heidi was eating lunch  yesterday, so I decided to tackle one of our kitchen junk drawers (we have 2 total).  I was sick and tired of the feeling I got every time I went to open this drawer, inwardly groaning to myself.  It had become difficult to find things, and I was also sure that there were at least a few things in the drawer that neither I nor Robb had even missed or looked for the entire time we have lived here. I was right!  But first, here's the "before" drawer pic:


A quick rundown of the items I found in here after examining the contents piece by piece:

  • 5 rolls of packing tape
  • 1 roll of duct tape
  • 1 Olympus 35mm camera (WITH film in it - it took me about 10 minutes to figure out how to wind the film in order to get it out of the camera - it's currently being developed at Target - can't wait to see what's on the roll!)
  • 1 Kodak 2.0 mega pixel digital camera (no, that's not a typo - 2.0 mega pixel) - this was a hand-me- down to Robb from his grandfather several years ago, who is impressively very technologically advanced - he's even on Facebook!)
  • 52 assorted batteries
  • 1 Winnie the Pooh address book (with addresses that I hadn't updated or added to since 1998)
  • Index cards
  • Stamps
  • Envelopes
  • Thank you notes
  • Cigar cutter
  • Tape measure
  • Wind up flashlight
  • Smoke detector (with no batteries)
  • Staples
  • 1 Swingline stapler - BTW, every time I think of a Swingline Stapler, I hear the words "have you seen my stapler?" and see this in my head - does anyone else? But I digress.... 


After examining all of the contents piece by piece in order to determine whether they should even be in the drawer, here are the items which didn't make the cut:

  • Olympus camera
  • Kodak camera
  • Cigar cutter
  • Winnie the Pooh address book
  • Smoke detector
I plan to donate the/recycle the cameras (anyone have any good suggestions for electronics recycling places?), the cigar cutter was relocated to the dining room with the cigars, and the Winnie the Pooh address Book was tossed in the trash (Facebook and Google and smartphones kind of makes address books obsolete these days anyways...).  I'm still trying to remember what I did with the smoke detector...

Here's the "after" pic of the drawer:


A few things I learned during this process:

  1. Battery storage - contrary to popular belief, batteries do NOT need to be stored in the fridge to lengthen their life, rather, it's more important that they be stored with all of the same ends up, and ideally, in their original packaging.  Read more about this here.
  2. For deep drawers like ours, it's a good idea to "layer" items based upon frequency of use - for example, our batteries are sitting on a box which houses spare pens, pencils, and markers, since we don't anticipate needing to access that box as frequently as we anticipate accessing the batteries (especially now that we have a 1 year old in the house!)
  3. Plastic containers of various shapes and sizes are great for helping to corral like items - and don't think that you need to rush out to The Container Store and purchase designer ones for this - the Gladware that your lunchmeat came in would work just fine for this as well (after a good washing, of course!).  The containers I put to use here were collecting dust in my basement - I knew I would find a use for them someday!
  4. You can never have too much packing tape :-)
Ok, now I'm off to find that smoke detector....

Sunday, November 21, 2010

Got chalk?

Every since we moved to this house in 2008, I've been toying with the idea of painting a small section of one of the walls in our kitchen with blackboard paint.  You see, I had painted the outside of one of our cabinets at our old house with it (upon the suggestion of a wonderful neighbor :-), and LOVED it.  I was waiting to find the right wall here though.

It dawned on me a couple weeks ago that I couldn't just paint a small section of wall - I needed to find a wall and paint THE WHOLE THING.  This epiphany came when I considered what would happen if Heidi saw Mommy drawing on the wall with chalk, but was told that she couldn't do the same....

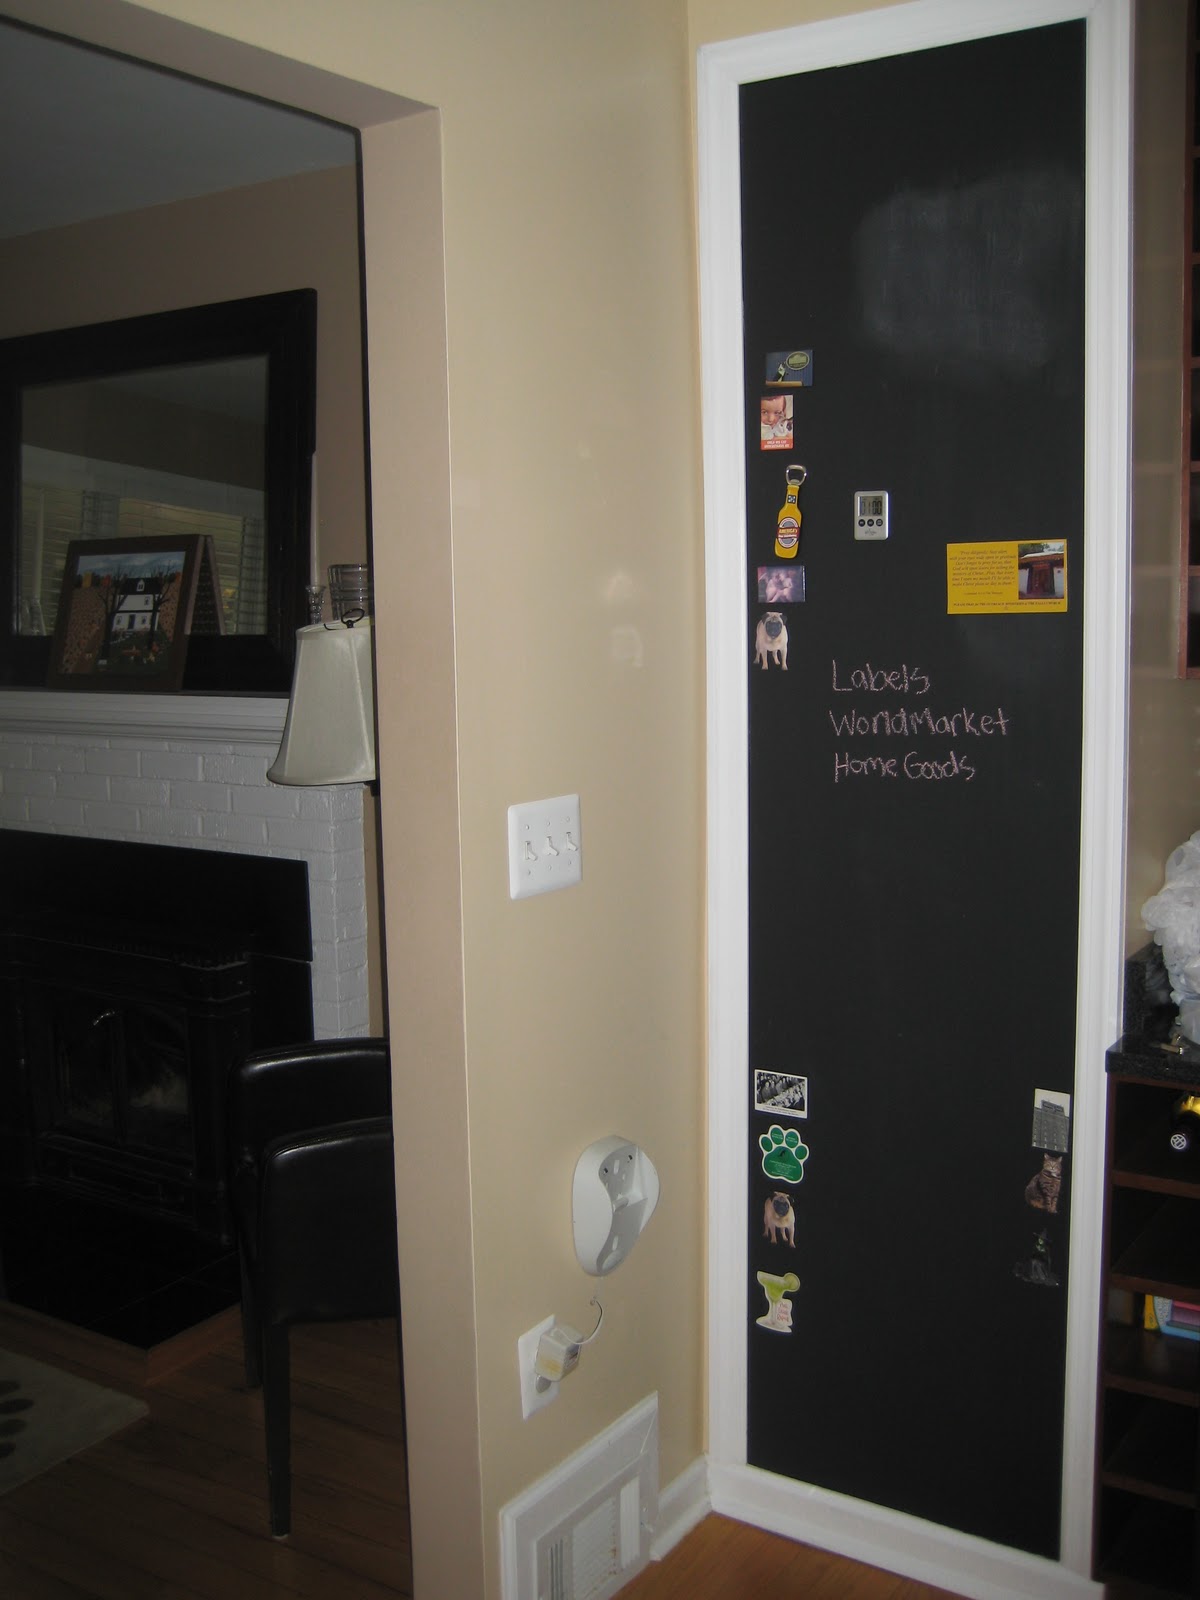
So, I found a small wall in one corner of our kitchen that wasn't being utilized, and went for it.  As an added twist, I first painted on several layers of magnetic primer after seeing this used by John and Sherry of Young House Love.  Here's the wall after the first couple coats of magnetic primer (I ultimately used about 5 coats of primer to maximize the "magneticness"):


And here's the wall after the final coat of magnetic primer:


And here's the finished product (I framed it with window/door molding I purchased from Home Depot, and painted the trim with some semi-gloss white paint that I already had purchased for another project):


The magnetic primer works well for those thin floppy fridge magnets, but not really anything more substantial than that.  Not really an issue for us, as the purpose of the magnetic wall was so that Heidi could enjoy playing with our fridge magnets that weren't being used anyway.  The chalkboard itself has proved life-changing - no longer do I have to scrounge around for a scrap of paper to jot down something to remember - I just grab a stick of chalk and write it right on the wall!  I'm sure Heidi will enjoy coloring on the wall as well - once she gets older!  Right now she just tries to chew on the chalk....

As I mentioned, the magnetic wall isn't really strong enough to hold magnets capable of holding multiple pieces of paper, so for organizing bills, coupons, etc., I've been able to put this nifty item back to use:


It's basically a metal grid, which came with those 2 clip on mail holders, 2 pegs/hooks, and a holder for pens/pencils.  I purchase it on clearance from Pottery Barn several years ago for use in our old hallway/office - until now, it was just collecting dust in the basement!  I added those coloful magnets, and a weekly whiteboard calendar, so now we have a "command center"  in our kitchen - and no more piles of mail strewn about the kitchen!

Friday, November 19, 2010

New uses for old frames....

I, like many other home design fanatics, looove Pottery Barn.  I eagerly await the arrival of each new catalog with the excitement of a kid on Christmas morning.  Once it arrives, I love to flip through the pages, not to plot my next purchase (Pottery Barn is pretty much out of our budget at this point), but to find room configurations that I can emulate, furniture styles that I like and can find for less (at IKEA or Walmart, as the case may be), and any other unique design ideas.

I recently stumbled upon a unique idea for jewelery display, courtesy of the geniuses at Pottery Barn:

I took one look and decided that this was something I could more cheaply replicate.  So, I checked out Craigslist for some old cheap frames, and scored four for $25.  I picked two of them to use for this project:


I already had a roll of wire from another project, and was able to purchase hooks at Home Depot for about $2.50.  I decided on silver metallic spray paint (which I already had as well):


So, after a little sanding and a few coats of spray paint (I purposely only roughly sanded the frames, as I wanted a "distressed" look), I had my own framed jewelery organizers:

I was pretty happy with how they turned out - and my grand total was only about $7 per frame (excluding the jewelery, of course :-)